Saturday, November 27, 2010

Roasted Strawberry and Rhubarb Compote


The other day my favourite magazine 'Dish' arrived in the post. I love this magazine!! When it first started I thought it was pretentious and a bit 'wah wah'...so to speak, as all it seemed to do was to be an advertisement for her cookshop (the name of which alludes me at this early hour of Saturday morning). I guess it was fair enough as it kind of went hand in hand that she would want to promote her business as well. As time has past the cookshop has gone and this is the focus she has (she being Catherine Bell), and very quickly this magazine became my most favourite. I'm one of those people who can't say no to cooking magazines and cookbooks. I subscribe to quite a few and buy the ones I don't get in the post. At this time of year it gets a little overwhelming as I have so many recipes around that I get confused or else want to make everything. As well as that there are the new and old cookbooks and the ones I get out of the library to see if they are worth buying. Needless to say my coffee table is now a sea of books and magazines and my mind is a messed up web of recipes.

I spotted this recipe in the Dish immediately. I love fresh fruit compotes and as we eat a lot of nice yoghurt as well as my homemade granola, and I do make crepes or pikelets when the boys are home on my weekends off, I thought this would go nicely. It's a very easy recipe but I think  I may have overcooked it a bit as it is quite jammy. It does, however, taste amazing. Strawberries are so cheap at the moment and after the immediate rush of eating them as they are because of the novelty of having them at all is so fresh, after awhile yo want to do something different with them. This is so lovely and well worth a go. I think I may even make it for Christmas morning breakfast as it would go well with granola and yoghurt, and would even be nice with the pastries I always buy from Sabato.

Without further ado here is the recipe:

Roasted Strawberry and Rhubarb Compote (from issue 33 of Dish magazine)

500 gm strawberries
350 gm rhubarb
finely grated zest of 1 lemon and 1 orange
1/3 c caster sugar
1/3 c brown sugar
1/2 tsp vanilla extract

Oven to 180 C

Hull the strawberries and cut the big ones in half. Cut rhubarb into 6 cm lengths and combine all ingredients into a baking dish that will hold them snugly (this is important so the syrup doesn't catch.

Roast uncovered for about 40 mins stirring every 10 mins until the liquid is reduced and syrupy. Stir carefully so the fruit doesn't all mush up.

Store in the fridge.

Fruit unadorned and looking beautiful

Ready for the oven

Out of the oven for the last time

YUM!

Monday, November 22, 2010

Baking for Nightshift...and Helen- Mini Pecan tarts


The boys grandmother has been sick recently and was in hospital for a few days. Happily she has now recovered and I thought I would make her something that I know she loves for a glad-your-feeling-better treat. I make these mini pecan tarts every year for Xmas and I know these are her favourite thing I make. Therefore she has a standard request for them each year. They are easy to make and taste really lovely and they also make wonderful Xmas gifts. The nuts can be varied depending on what you have in the cupboard. This time I made double the quantity so I could take some into work tonight, so I made pecan and walnut tarts as I didn't have enough pecans. 


The pastry is made quickly in a food processor until it forms a ball which you just push together to make sure it isn't too dry. I have never had to alter or add anything here so the quantities of each ingredient are perfect just keep that processor going until it does form a ball and you will end up with something that looks like this...


I use my digital scales to measure how much pastry I will need. I find that around 20 gms gives the perfect amount of pastry for each mini tart.


Out of the freezer


Quite possibly one of the best things I have ever bought was a wooden tamper from Millys which means you can roll a ball of pastry, put it in the greased or oiled tin and instead of mucking about trying to line it by hand you just push the tamper in to give the perfect thickness. These are very cheap and an absolute must for making these easy and quick to prepare. I also have the standard size one and I think they even have a Texas size one too.


I forgot to take progress photos so here is a quick one taken with the oven door open

Cooling on a rack
A couple of tips... turn them in the tins as soon as you can. I find that leaving them for a few mins is ok and doesn't kill my fingers; the mixture doubles well; remove them from the tins as soon as you can or they will be hard to take out; oil the tins well; finally try to hold yourself back from eating lots of these.


Mini Pecan/Nut Tarts


Pastry


125 gm cold butter
1/2 c icing sugar
1 c flour


Process until a ball forms then line about 16-18 mini muffin tins which have been pre greased (I use spray oil). Freeze or refrigerate for at least 1/2 hour.


Filling


1 egg
1 c brown sugar
1 tsp vanilla
60 gms melted butter


Mix together well.


Into the prechilled cases put in some finely chopped nuts. Pecans are best but a mix of other nuts is great too. Then top with some of the mixture but be careful to not overfill the cases.


Bake at 180 C for around 20-25 mins.


AS soon as you can give them a little twist in the tin to release the pastry. Then remove them to a rack as soon as you can lift them out. You can see that some of my bases stuck but they can be put together easily enough. It was that particular tin I used I think.

Sunday, November 21, 2010

Harry Does the Westmere Kids Try (Triathalon)

Today was a very proud day for us as Harry completed his very first Tryathalon. This was the schools inaugural 'Westmere Kids Try' which was held for both a school community get together but primarily as a fun way to raise money for the new hall. It was such a wonderful event. Unfortunately even though we have been having glorious weather, this weekend chose to be a bit rough and ready with showers and wind so we were a bit dubious that it would even go ahead as we looked out of the window this morning to torrential rain. However the forecast was for showers clearing so the event went ahead. It was a little bit miserable when we arrived but the showers cleared and the wind wasn't too bad and we even got a bit of sun in the later half of the morning. For the little ones the tryathalon started with a 500 m run, followed by a 1 km bike ride, then a 50 m water slide. Parents could enter in for the team event which meant they could do the run and the child do the bike ride and water slide, but as I don't think I could run 100 m let alone 1 km, Harry went into it in the individual section... luckily for me he didn't even consider the team event!


He was incredible and ran the whole 500 m without stopping. The bike ride was always going to be a bit hairy as he isn't that confident on his bike so a lovely teacher (Anne) from the school went around with him. As the grass was wet from the rain, it was just as well as I think he would have ended up walking by his bike and dragging along. But he was determined to not have to get off his bike at all so he plugged on and stayed riding the whole way with the teachers help. Most of the little kids ran on the water slide not realising they could run then slide so it was quite cute. The most amazing thing was Harry's determination to finish it and give it a go. The whole spirit of the event was to participate so there were no prizes for 1st, 2nd or 3rd place so it really took the element of competing out of the mix which I think added to the great vibe of the event. So all in all a great morning despite the dodgy weather. Here are some photos:


Talking to Alison Roe a well known NZ champion athlete

Doing the wheel to win a prize- he got a flashing yo yo


With his friend from school

The (lovely) Principal talking about the rules

Going to the start line...they staggered the kids

Finishing the run and walking to his bike

The lovely teacher who was waiting to help him
 
On the bike ride


Finishing the water slide...which he ran down...

End of the race


With the goodie bag


Bunny face paint


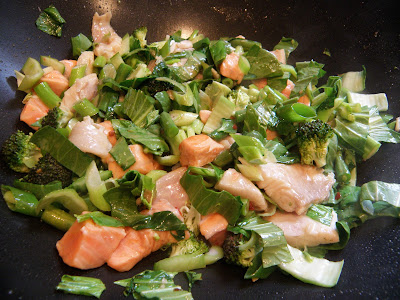
Sesame Fish with Vegetables and Noodles

Before the soy was added


For my last set of nights I tried to make sure I had something reasonably healthy to eat before I left. While I don't always manage to do this, most night's I do try to cook a meal at home to either have before I start work or else to have later on in the night. My boys are not overly keen on fish. Harry used to love it and he especially loved smoked salmon, but now he is pretty sure that he doesn't like it at all. It's such a pity as fish is such a good, healthy source of protein and Dons and I love it, so I make sure we get to indulge when the boys are at their dads house. This week when I went food shopping they had some lovely fresh looking salmon and some terakihi also on special. They have a very high turn over in their fish department so I know the quality is pretty good....important to know when you are buying fish! 


I had seen this recipe in the new Jo Seagar book and it appealed to me in that it had fish, noodles and was fast and easy to cook. The fish is marinated in a few bits and pieces first then stir fried with some beans and pak choi with some rice noodles added in at the end with the marinade. As Dons is gluten free it meant she could eat it too. I did adjust the recipe a bit and added in a couple of things which I think made it a lot more tasty as it was initially a little bland. With the additions of garlic, ginger and soy sauce (or Tamari), it was a really lovely dish and one that I will make again. It was even delicious when I had some at work. By then it was more of a cold salad and even though I could have heated it up, I really liked it cold too. This is a dish you can feel virtuous eating as it is healthy, low in fat and very tasty (once I added a few things).


In the wok before the noodles are added
Sesame Fish with Vegetables and Noodles (adapted from Jo Seagar 'It's Easier Than You Think')


700 (or so) gms fish (you can use anything you like or a mixture), cut into bite sized pieces
6 Tbsp sweet chilli sauce
2 Tbsp fish sauce
1 Tbsp sesame oil
2 Tbsp rice wine vinegar
2 Tbsp oil (I used grapeseed but anything flavourless)
couple of cloves of garlic crushed
some grated ginger
spring onions (I used 3 big ones), sliced diagonally
Green beans chopped into small lengths
Brocolli chopped into small florets
pak choi sliced
250 gms rice noodles (I used vermicelli)
1 Tbsp toasted sesame seeds
1 Tbsp black sesame seeds
Light soy sauce or tamari 
Limes to serve


Place the fish in a bowl with the sweet chilli sauce, fish sauce, sesame oil and vinegar and stir to coat. Marinate for about 10 mins.


Soak the noodles in boiling water for 10 m ins then drain. If your waiting to use them, rinse with cold water.


Heat the oil over a med heat and cook the fish for a couple of mins. Add the garlic, ginger and veges and stir fry to heat through and cook a bit. Add the marinade mixture and heat through. Add the noodles.


Serve with the soy sauce or Tamari, lime wedges and sprinkle with the seeds.


Friday, November 19, 2010

Gluten Free Sponge Cake for Dons

The other day my mum came over for dinner which was the perfect chance to whip up something for dessert. Dons is gluten free and her most favourite thing in the worked for dessert is sponge with cream and strawberries. My mum also loves it so I thought I would give it a go. I have only ever made sponge once before but as we all know, the key is to whip in as much air as you can and then try not to deflate it when you add the flour. In this case the flour component was cornflour. I was a bit worried as sometimes cornflour can leave a bit of a powdery taste in you mouth. However I needn't have worried after all. The sponge itself was delicious. It was very easy to make although I think having a Kitchen Aid (my most favourite kitchen tool as I use it ALL the time), makes the whole process much easier. The other thing the recipe said to do was to drop the tin as soon as it comes out of the oven from knee height onto the floor (this is also something our grandmothers would have done). I dubiously tried this and I think it really does work. The reasoning behind it is to 'shock' the cake into not deflating anymore than it needs to. 


The only problem I had was my tin sizes. The recipe says to use 2 x 21 cm tins which I did use but my mixture was very airy and rose well almost spilling over the side. As well as  that it didn't deflate all that much which made the sponge cake very very tall especially once you added the whipped cream and strawberries.


Hmmm a bit overfull


Next time I'll use a 23 cm tin...


Very tall still even after the 'drop'


Regardless of how tall the cake looked  once they were joined, it still tasted really good. When I whipped the cream I added some vanilla extract and a bit of icing sugar which worked really well with the light sponge and the ripe strawberries.


Terrible photo but it had to be done quickly as they were all waiting to tuck in
Of course it had icing sugar on top so for anyone who remembers or has seen the wonderfully kitsch and endearing Australian movie called 'The Castle' will remember the bit that the mum (who like to do a bit of home craft) presents to the dad her sponge cake. He asks what she has that on the cake to which she says 'icing sugar'. He says why would anyone eat at a restaurant if you kept getting food like that everyday. And I guess that's true really!


Anyway here is the recipe:


Gluten Free Sponge Cake (from Jo Seagar 'It Easier Than You Think')


1 c sugar
3 Tbsp water
4 eggs separated
1/2 tsp vanilla
1 1/2 c cornflour
1 tsp baking powder
1/2 tsp salt


Oven to 180 C. Grease 2x 21 cm tins (next time I'll go for 23 cm) and line the base.


Put the sugar and water into a pot and dissolve the sugar then bring to a boil.


Beat the egg whites until stiff then slowly drizzle in the hot sugar and water mix while the mixer is running. Then beat really hard. Mix in the egg yolks and vanilla.


Sift dry ingredients and then carefully fold them into the egg mixture. Pour into the prepared tins and bake 20 mins. As soon as you take the tins out of the oven drop them from knee height square onto the floor. Cool in the tin.


Serve with whipped cream and strawberries in the middle and yes, dust with icing sugar.

Thursday, November 18, 2010

Baking for Nightshift- A 'Bundt' of a Disaster

Tonight is the first of 2 nightshifts for me and as I usually take some baking in, I made some time for baking for work this afternoon. I have been inspired by the The Food Librarian's blog who has admirably just finished baking 30 Bundt's (mostly sweet but some savoury) in 30 days ending on National Bundt Day...I know I never knew such a thing existed! Therefore when I got Jo Seagar's new cookbook the other week, I noted that she had a recipe for a Lemon Syrup Buttermilk Cake and as I have a silicone Bundt tin, I thought I would give it a go. Well what a disaster!! The cake itself is beautiful....lemony, delicate and moist, however the tin is most definitely NOT! I did wonder if it would be difficult to get the cake out even though I had generously sprayed it beforehand and it was. The cake pretty ,much broke in half and it all stuck to the little grooves of the tin.

Tragic isn't it?

Just to emphasise the tragedy...

I had already cleaned most of it by now...it made it's way to my mouth ;-)
As the cake itself tasted really good I decided to try to save it so made a lemon buttercream icing and used some of the leftover syrup to make it instead of adding milk or water. Here it is hopefully salvaged a little. No doubt the girls will still appreciate it even if it does crumble a little. By the way the dregs in the pan were really good with some of the lemon curd I made yesterday. I'll give the recipe as this was a truly lovely cake...next time I'll either get a proper bundt tin or else make it in a normal cake tin and as for the old silicone one...it's now holding pride of place in the bin!


Nothing like a bit of buttercream to hide a multitude of errors


Harry's piece (who ate it all up and loved it)

Lemon Syrup Buttermilk Cake (from Jo Seagar 'It's Easier Than You Think')

200 gm softened butter
1 1/2 c caster sugar
3 eggs
grated rind of 2 lemons
1/4 c lemon juice
3/4 c buttermilk
2 c self raising flour

Oven to 180 C. Grease a tin...good luck if it's a silicone bundt tin!!!

Beat butter and sugar until light and fluffy. Add eggs one at a time beating well after each.

Add lemon rind, juice, buttermilk and flour and mix together well.

Bake 45-50 mins.

Lemon Syrup

grated rind of 2 lemons
1/4 c lemon juice
1/4 c water
1/2 c caster sugar

Dissolve sugar over a medium heat with all the other ingredients. Boil 3-4 min and pour over the still warm cake.

Wednesday, November 17, 2010

Sunshine and Lemon Deliciousness

 Doesn't this Lemon cordial look like summer in a bottle? Today is the most glorious, sunny and hot day. As I worked all weekend including Friday on long days (that is 8.30am to 9.30pm), I missed the beautiful weekend we had here in Auckland. Luckily for me this week has also been lovely so I haven't missed out too much. It can be so hard looking out the windows of the hospital and just wanting to get out there yourself and join in the weekend fun. However today I took the opportunity to relax by using up some lemons our lovely neighbour gave me. I have figured out that I am an 'active relaxer' in that I have to be doing something that I enjoy to get the same benefit as someone else might get from lying around with a good book. Therefore for my 'relaxing' day off I have pretty much been in the kitchen all morning.

First up was this cordial. It is so easy to make and tastes so good. It's particularly good topped with some soda water and as we have a soda stream we have a ready supply of fizzy, filtered water. I also thought it would be lovely with some fresh mint, lots of ice and some vodka (for an adult treat). I think I'm going to try that tonight... I also thought it would make lovely Christmas gifts so this is what I will do this year. It can be quite stressful making homemade Christmas gifts and it can end up costing a small fortune especially as I am so particular. But this year I think I will make this, some lemon curd, maybe some homemade granola, and finally some truffles.


 Here is the lovely lemon curd I made from Jo Seagar's new cookbook. It was very, very easy requiring only a pot and a bowl. What I loved about it, other than its lemony deliciousness, is that there in no faffing about with a double boiler. It's all made in a pot and then I strained it before putting it into the jars to get out any bits of cooked egg white. This is lovely in little tarts, with ice cream, on bagels or with a number of other things. I'll be surprised if it lasts a week in this house as it's all too easy to just-have-another-spoonful-of.  


Don't they look beautiful....so summery...
Lemon Cordial

4 c sugar
4 lemons- juice and rind
4 c boiling water
1 1/2 Tbsp citric and tartaric acid

Dissolve the sugar in the water. Bring to the boil, add the acids, juice and rind and leave to cool. Bottle.


Thick Lemon Curd (Jo Seagar- 'It's Easier Than You Think')

200 gm butter
1 c caster sugar
grated rind and juice of 3 lemons
4 eggs

Melt the butter in a pot. Whisk the eggs, juice, rind and sugar together and then into the butter until well combined. Whisk continuously while the curd thickened and just comes to the boil. Remove from the heat, sieve through a strainer and cool in the jars. Store in the fridge and try not to eat it all yourself before you find something to do with it.

Thursday, November 11, 2010

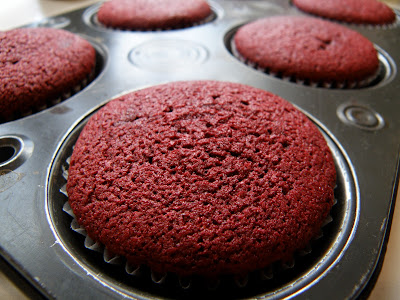
Baking for Dayshift- Red Velvet Cupcakes


I normally try to work night shift but this week I am sticking to my days. These shifts are 13 hours long so there isn't any time for baking in the middle of them. I really wanted to take something to work for one of the shifts so tomorrow was the only option I had but I had to be able to whip it up quickly after school pick up. I have made red velvet cake before when I made Reuben's Friday the 13th birthday cake last year. It actually tastes really good despite looking like it would taste processed because its very red colour. It's kind of like a light chocolate cake but really, it's to be said, the cream cheese icing is really the star that makes this cupcake or cake sublime. The soda, vinegar and buttermilk makes this cake light in texture and the cocoa gives it the flavour. So give it a go...and don't be put off the amount of food colouring you need. If you look on the internet you might find a recipe for one which has beets boiled to get the same colour, but I personally can't really be bothered with the whole drama of adding in that process. You could also use the proper gel colours as you will need less of it but hey, the plain old food colouring from the supermarket does a good enough job and, to me, has no flavour to ruin the cake.


So here is the recipe:


Red Velvet Cupcakes (makes 28)


120 gm butter
1 1/2 c sugar
2 eggs
5 Tbsp cocoa
6 Tbsp red food colouring (basically one whole bottle of the stuff)
1 tsp vanilla
1 c buttermilk
2 1/4 c flour
1 tsp salt (I use salted butter so didn't add this)
1 tsp baking soda
1 Tbsp vinegar


Oven to 170 C and line muffin tins with papers.


Cream butter and sugar until light then add the eggs one a t a time beating well in between each.


In a separate bowl mix the cocoa, vanilla and food colouring to a thick paste. Add to the butter mixture beating well.


Add 1/2 the buttermilk, mix then add 1/2 the flour. Repeat and make sure the mixture is well incorporated.


Add soda, vinegar and salt. Mix well until nice ans smooth but don't overbeat. 


Bake about 20 mins and top with cream cheese frosting.


Frosting


150 gm butter
150 gm cream cheese (traditional not spreadable)
4 c icing sugar
1 Tbsp vanilla


Beat cream cheese and butter together. Add vanilla then add the icing sugar cup by cup. Beat until fluffy and creamy. I did this in my Kitchen Aid but you could do it in a food processor or with a hand mixer.


Getting ready for the oven

Just baked

Yum!!!

FFwD- Potato Gratin


For this weeks FFwD, (which I am posting on Thursday due to the fact that I am working a 13 hour day tomorrow), I chose Potato Gratin also know as Potato Dauphinois. It was very easy to make and involved heating some cream (well in my case lite cream and milk) with some garlic, thinly slicing potatoes, sprinkling over a bit of salt and pepper and rosemary, pouring over the cream, then topping it all off with some cheese before baking it. Very easy for a lovely result. Unfortunately for me I used the lite cream which I think made it a bit watery. Even though it tasted lovely, it just lacked that delicious creaminess and 'treat'factor. Regardless this is a make again....so long as it's made with normal cream.