Monday, June 17, 2013

Baking for Nightshift- Chocolate and Banana Brownies


I haven't been baking much for night shift as I have been so busy with just living life and being a working mum. When I have baked it has been something I have made before so I haven't blogged about it or else I have taken photos and then waited so long I have forgotten where the recipe was from. I saw these on a blog I follow called Baking Makes Things Better which is  NZ run blog now attached to Food TV. The site is not too bad....mostly I find it's a bit basic, but I sometimes find a recipe I want to give a go and this one I saved a while ago for when I had motivation and some over ripe bananas. I'm not a huge fan of banana cake and I often have lots of ripe bananas due to the fact that in our household three out of the four of us will only eat a banana when it's almost green. As soon as it goes yellow we aren't interested. Thank goodness for the Yonanas!

Anyway this is yummy. It has a rich chocolate taste and a slight banana flavour. Delicious and easy to make and well worth making again. 


Chocolate and Banana Brownies

175g dark chocolate
175g butter
150g brown sugar
2 medium sized bananas
2 eggs, lightly beaten
1 teaspoon vanilla essence
100g self raising flour
2 teaspoons cocoa
¼ cup chocolate chips (I used milk chocolate)

Preheat your oven to 180°C.  Grease and line a 20cm square tin with baking paper.

In a large saucepan over a medium heat, melt the chocolate, butter and sugar together, stirring until smooth.  Once melted and mixed together, remove from the heat.
In a bowl, mash up the bananas roughly with a fork (I like to have chunks of banana in the brownie).  Add the eggs, bananas and vanilla into the chocolate mixture and stir until well mixed.

Sift in the flour, cocoa and chocolate chips (if using) and mix well.

Pour the mixture into the prepared tin and bake for 30 – 35 minutes.  Remove from the oven and allow to cool completely in the tin before cutting into squares and serving.


Sunday, June 16, 2013

Caramel, Apple and Raisin Scrolls


Yum yum yum yum yum! The actual name of this recipe started with the word 'Quick'. I have to say that while they weren't overly time consuming one thing they weren't was quick. There are a few components like cooking the apples, making the caramel/nut topping, the butter filling and the scones. Then the putting everything together. However if you like sweet you will like these. they were delicious on the day and are still delicious today. I found I need to melt the butter a bit for the filling to get it to a more spreadable consistency, and add a bit more buttermilk to the scone  mix as I find a pretty wet scone mixture makes them so much more tender. As well as that take my advice and use a tall tin (or a normal sized cake tin). Mine was shallowish and some of the caramel bubbled up and over in my oven making. I used a 20cm square tin as I don't have a 24 cm tin....that will have to be the next thing I purchase I think. I got the recipe from Dish Magazine on the Facebook page where they post a baking recipe every Friday and knew I would try it the very next day when I wasn't working so here it is for those of you who don't have Facebook.

Caramel, Apple and Raisin Scrolls

2 apples, peeled and sliced ½ cm thick
1 tablespoon butter
1 tablespoon caster sugar

Base
¼ cup melted butter (60g)
½ cup brown sugar
2 tablespoons maple syrup
½ cup roughly chopped nuts, I used pecans (they used hazelnuts)

Filling
3 tablespoons butter, very soft but not melted
½ cup brown sugar
1 teaspoon ground cinnamon
¼ cup raisins, finely chopped

Dough
1 cup milk
1 tablespoon lemon juice (I used buttermilk as this is what I had and I used maybe 1/4 more)
3 cups plain flour
3 tablespoons caster sugar
1½ teaspoons baking powder
½ teaspoon baking soda
½ teaspoon sea salt
¼ cup melted butter
1 teaspoon vanilla extract

Grease a 24 cm square cake tin and fully line with non-stick foil, bringing it right up the sides of the tin. Take care not to pierce the foil.

Preheat the oven to 200˚C.

Melt the butter in a sauté pan and add the sugar and apples. Cook for about 8 minutes until the apples are soft but not falling apart. Set aside to cool.

Base: Combine the butter, sugar and maple syrup in a bowl then spread evenly into the base of the tin. Scatter over the nuts. Set aside.

Filling: Place all the ingredients in a bowl and beat until combined. 

Dough: Stir the milk and lemon juice together and leave for 10 minutes. This makes a quick buttermilk.
Combine all the dry ingredients in a large bowl. Combine the milk, butter and vanilla and pour onto the dry ingredients. Combine with a fork to make a shaggy looking dough.
Tip onto a lightly floured bench and gently bring the dough together. Roll out to a 20 cm x 40 cm rectangle. Don’t over-work the dough or the buns will be tough. 
Spread the soft filling evenly over the dough and place the apples in a single layer over the top. Starting at the long side, roll the dough into a log. Cut into 12 even pieces and place cut side down in the tin.
Bake for 20-25 minutes or until puffed and golden and the caramel is bubbling up around the edges. 
Place a piece of baking paper then a plate over the top and invert the buns, taking care not to get hot caramel on you. Remove the foil. Serve warm

Tuesday, June 11, 2013

Harry and His Second Ballet Competition

Getting his stage makeup on at home and his hair done


Ballet-mom 'pep-talk'

Me looking 'middle of night shift tired' at the venue

Mama and Pup

Waiting waiting waiting....nice pointed toe!


He works hard on getting more and more flexible....amazing as I can't even touch my toes!


Ready and waiting


About to go on stage...nervous but this ballet-mom needed a photo to 'Show Ms A" (his ballet teacher)
Last weekend was Harry's second ballet competition....the Manurewa Combined Dance Association. This is our second competition and it was with horror that I happened to find out that the date had been changed and it was that weekend and not the weekend after. Most horrifically I was in the middle of night shift so was totally unprepared for it. It meant that I had to race home and go to bed (about 930am) while Dons took him to his private lesson and film it for me. Then he went to his dads house and he brought him home to me at 3pm. I woke up at 2pm so was pretty tired especially knowing I had to race back for another nightshift. That's why I look so shattered and makeup-less....well that's my excuse and I'm sticking to it!

We had a different costume which I hired while we wait for his proper one to be made. He next has a competition in July so he should have a lovely new costume for that one as well as one for his new Barefoot dance. I think he looks SO adorable!!! I think he was pretty pleased with the whole look too.

He got another Highly Commended and once again we almost burst with pride at our baby's achievement. He works so hard and he has so much passion for dance it's an amazing thing to be a part of. It made the sleep deprivation worth it! 

Monday, June 3, 2013

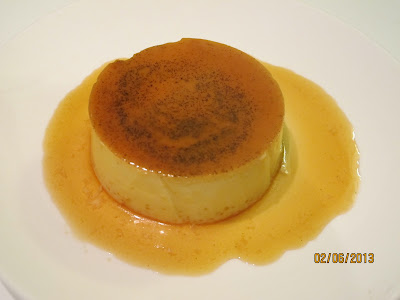
Creme Caramel


I have always wanted to try making Creme Caramel and even though it seemed simple I have read about many many disasters....mostly with getting the thing out and looking lovely. I saw this recipe in the Saturday Herald's Canvas magazine by Donna Hay. My natural instinct is to then go online and proceed to over-read more recipes to confuse myself and make me doubt the recipe I had originally seen. Although I did do that, I ended up biting the bullet and going with the first one I had seen. I figured it could be a bit of a costly mistake as it uses 6 eggs! But sometimes you just have to take the plunge and I'm glad I did because this dessert is delicious! We all loved it. 

The caramel was perfect and taken just to the right point where it was rich and dark but not burnt. The custard was delicious just like a good baked custard should be. They came out of the ramekins easy too. The only bummer is that not all the caramel comes out and because it's so good it seems like a waste. I dipped the bases of my ramekins into a small amount of boiling water so the caramel would melt and they would unmold easily. I also ran a sharp knife around the edge of the custard. So this dessert is easy, delicious and well worth making. I'm sure it will be in hot demand with my family. If you want to give this a go you can find the recipe here.